
Technique ATC - Paper Bleaching
Launch gallery slideshow
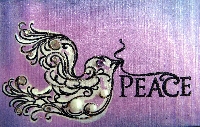
| Group: | Paper Cutz |
| Swap Coordinator: | dobie256 (contact) |
| Swap categories: | Art Artist Trading Card (ATC) Handmade |
| Number of people in swap: | 6 |
| Location: | International |
| Type: | Type 3: Package or craft |
| Rating requirement: | 4.90 |
| Last day to signup/drop: | December 31, 2010 |
| Date items must be sent by: | January 31, 2011 |
| Number of swap partners: | 2 |
| Description: | |
|
I was introduced to a fun technique last month and have been playing with it ever since. So I thought I would host an ATC swap using this technique. Hope you all enjoy! You will be making 1 ATC for each of two partners (2 ATCs total). It is a technique that uses bleach to lighten the color of your paper. There are many different ways you can do this. The way I was shown was to stamp and emboss an image on to your paper. That is the easiest way to do this technique. But I have also done hand-drawing with Micron pens (zentangles mostly) and that will work too. You will need: CHEAP colored cardstock. The kind you find at hobby stores at low prices. No texture. I find "The Paper Company" and "Reflections" papers work beautifully. Cheap old-fashioned 100% laundry bleach (not the fancy concentrated stuff). An image As mentioned before you can stamp and emboss your image. Or you can hand-draw an image with some kind of permanent markers (I use Micron pens). Optional - colored pens, colored pencils, chalks, bling. Feel free to embellish your image however you wish. I don't do collage, but if you wish you can use this technique to create a nice background for collage work. This ATC is open media as long as the bleach technique is used as a noticable element. So be creative and have fun! Technique instructions: Test your paper (and pens) before you begin designing! Test both your pens and your bleach on a piece of scrap paper! Some papers don't bleach well. Some pens bleed when the bleach hits them. Bleeding should not be a problem if you used a stamped and embossed image.
Apply your bleach carefully. Full strength. (Do this over newspaper, a craft mat, waxed paper, etc. in case of bleed-through). I lightly dab the blender pen tip against the paper. If you rub and scrub too much you will smear your penwork (even Micron pens). It sometimes takes a minute or two for the full effects of the bleach to appear -- be patient. Optional -- embellish your design with paints, chalks, colored pens or pencils, perfect pearl powders, bling, etc. Here is an example I did on blue paper Here is an example I did on pink paper You can see more examples on my Flickr site Please feel free to PM me with any questions or problems. Usual rules apply. Send something you are proud of! No sticker slapping! And absolutely no flaking! | |
Discussion
Leave a Comment
You must be logged in to leave a comment. Click here to log in.

- Info:
- Home
- |
- About
- |
- Forum Rules
- |
- Terms of Use
- |
- Press
- |
- Advertising
- |
- Blog
- |
- Graphics & Stuff
- Help:
- New User Info
- |
- FAQ
- |
- Group Info
- |
- Glossary
- |
- Forums
- |
- |
- Contact Admin
